由于已有某套图书的旧版本,而买新的一套又太贵,因此决定打印 PDF 电子书凑合一下。奈何很多网站的免费电子书均有水印,打印起来会很不舒服,而收费的某考研网站 PDF 需要 5元/本。于是自己探索了一下 PDF 去水印的思路,后续对 PDF 文件纠偏一下,就可以打印了。
这里发现一件好玩的事情:免费 PDF 的来源似乎就是这个收费网站,因为他们给的样图中,出现了同一页扫描偏了的情况。
使用到的工具:
Python 3.10
Adobe Acrobat Pro DC 2021 (来源 )
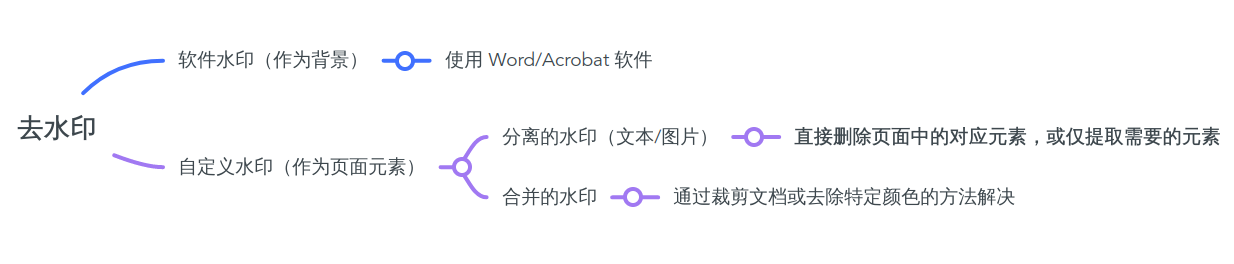
根据我的观察,常见的水印有两种:PDF 软件自带的水印与自定义水印。前者可以在 Adobe Acrobat 中点击 水印 - 删除,而后者又主要包括文字水印和图片水印。如果水印和影印图片是独立的页面元素,那么就好分离了。我遇到的正是这样的情况。
观察 PDF 文件中的水印:每页底部均有红色文字水印,可选中,意味着是文本元素。
某些页面含有文字背景水印,如:
还有一些页面包含少量灰色的图片水印,由于现在找不到了,这里略过。总的来说,这套 PDF 文件中有两种文字水印和一种图片水印,水印图片的大小在 1000 * 1000 以下,那么我的思路就是以页为单位,导出所有 1000 * 1000 以上的图片。
在使用程序遍历图片的过程中,发现其类型有 PNG、JPG、JPG2000 三种。
Python 中操作 PDF 文件的库很多,这里有一份对比 《使用Python操作PDF:常用PDF库总结 - 知乎》 。
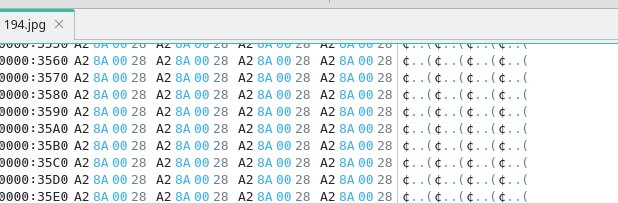
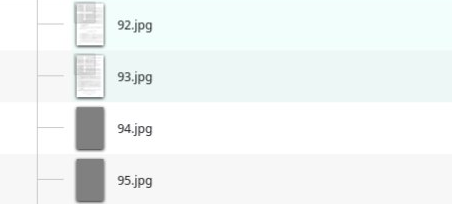
在使用 borb 库导出图片时我遇到了一个大坑:只有少数类型为 JpegImageFile 的图片导出成功了,其他图片虽大小正常,但显示为灰色。使用十六进制编辑器打开发现所有像素均被置为灰色,很是奇怪。
1
2
3
4
5
6
7
8
9
10
11
12
13
14
15
16
17
18
19
20
21
22
23
24
25
26
27
28
29
30
31
32
33
34
35
36
37
38
39
40
41
42
43
44
45
46
47
48
49
50
51
import typingfrom os import path, mkdirfrom pathlib import Pathfrom borb.pdf.document.document import Documentfrom borb.pdf.pdf import PDFfrom PIL.JpegImagePlugin import JpegImageFilefrom PIL.Jpeg2KImagePlugin import Jpeg2KImageFilefrom PIL.Image import Image as PILImagePDF_PATH = Path('/home/sunnysab/Desktop/2023王道计算机数据结构考研复习指导【公众号:考研不二家】免费分享.pdf' ) ''' 打开文件 ''' document: typing.Optional[Document] = None with open (PDF_PATH, 'rb' ) as in_file: document = PDF.loads(in_file) assert document is not None ''' 输出基本信息 ''' page_count = document.get_document_info().get_number_of_pages() page_count = int (page_count) print(f'''{PDF_PATH.name} loaded, {page_count} pages..''' ) ''' 完成处理前的准备工作:创建输出目录''' OUT_FOLDER = f'/home/sunnysab/Desktop/{PDF_PATH.name[:PDF_PATH.name.rfind("." )]} ' if not path.exists(OUT_FOLDER): mkdir(OUT_FOLDER) print(f'Folder {OUT_FOLDER} was created.' ) ''' 开始处理 PDF 文件, 导出图片 ''' count = 0 for i in range (0 , page_count): for key, value in document.get_page(i)['Resources' ]['XObject' ].items(): if isinstance (value, (JpegImageFile, Jpeg2KImageFile)): ext = 'jpg' elif isinstance (value, PILImage): ext = 'png' else : print('Ignored: %s\t%s' % (key, str (value))) continue image: PILImage | JpegImageFile | Jpeg2KImageFile = value if image.width > 1000 and image.height > 1000 : image.save(f'{OUT_FOLDER} /{count} .{ext} ' ) count += 1 print(f'Saved: page = {i} , count = {count} ' )
十六进制编辑器预览图:
资源管理器预览图:
先吐嘈一下 pyMuPDF,编写库的时候没有为函数参数和返回值类型添加注解,导致 IDE 的类型提示几乎不可用…但是文档很清晰,示例丰富。
编写代码如下:
1
2
3
4
5
6
7
8
9
10
11
12
13
14
15
16
17
18
19
20
21
22
23
24
25
26
27
28
import fitz from os import path, mkdirfrom pathlib import PathPDF_PATH = Path('/home/sunnysab/Desktop/2023王道计算机操作系统考研复习指导【公众号:考不二家】免费分享.pdf' ) pdf: fitz.Document = fitz.open (PDF_PATH) OUT_FOLDER = f'/home/sunnysab/Desktop/{PDF_PATH.name[:PDF_PATH.name.rfind("." )]} ' if not path.exists(OUT_FOLDER): mkdir(OUT_FOLDER) print(f'Folder {OUT_FOLDER} was created.' ) count = 1 for page in pdf: images = page.get_images() xref, _, width, height, _, _, _, _, _ = images[0 ] print(xref, width, height) if width < 1000 or height < 1000 : continue image: dict = pdf.extract_image(xref) ext: str = image['ext' ] image: bytes = image['image' ] open (f'{OUT_FOLDER} /{count} .{ext} ' , 'wb' ).write(image) count += 1
成功导出了图片文件!
这里解释一下 extract_image 函数。根据官方的 文档 :
PDF Only: Extract data and meta information of an image stored in thePixmap creation, etc. This method avoids using pixmaps wherever possible to present the image in its original format (e.g. as JPEG).
Parameters
xref (int ) – xrefrange(1, doc.xref_length()), or the object is no image or other errors occur, None is returned and no exception is raised.
Return type
dict
Returns
a dictionary with the following keys
ext (str ) image type (e.g. ‘jpeg’ ), usable as image file extension
smask (int ) xref
width (int ) image width
height (int ) image height
colorspace (int ) the image’s colorspace.n number.
cs-name (str ) the image’s colorspace.name
xres (int ) resolution in x direction. Please also see resolution
yres (int ) resolution in y direction. Please also see resolution
image (bytes ) image data, usable as image file content
1
2
3
4
5
6
7
8
9
10
11
d = doc.extract_image(1373 ) 'yres' : 96 , 'cs-name' : 'DeviceRGB' ,'image' : b'\x89PNG\r\n\x1a\n\x00\x00\x00\rIHDR\x00\x00\x00\x05\ ...' }imgout = open (f"image.{d['ext' ]} " , "wb" ) imgout.write(d["image" ]) imgout.close()
每次将导出的图片文件转换成 PDF 太麻烦。在我的机器上,Adobe Acrobat 转换耗时大约是 每张一秒出头,而 Windows 的打印机和传真则更慢,不如使用代码将其合并为一个 PDF。pyMuPDF 库本身支持打开图片文件,同时它也提供了 insert_pdf 函数可将一个 pdf 文件添加到另一个 pdf 文件。基于此,我们将图片在内存中转换为一个 pdf 文档,再添加到最终的 pdf 文件里即可。完整代码:
1
2
3
4
5
6
7
8
9
10
11
12
13
14
15
16
17
18
19
20
21
22
23
24
25
26
27
28
29
30
31
32
33
34
35
36
37
38
import fitz from pathlib import PathPDF_PATH = Path('/home/sunnysab/Desktop/2023王道计算机组成原理考研复习指导.pdf' ) pdf: fitz.Document = fitz.open (PDF_PATH) out: fitz.Document = fitz.open () FILE_TITLE = PDF_PATH.name[:PDF_PATH.name.rfind("." )] OUT_FILE = f'/home/sunnysab/Desktop/{FILE_TITLE} _output.pdf' count = 0 for page in pdf: images = page.get_images() xref, _, width, height, _, _, _, _, _ = images[0 ] if width < 1000 or height < 1000 : continue image: dict = pdf.extract_image(xref) ext: str = image['ext' ] image: bytes = image['image' ] stream = bytearray (image) current_page_img: fitz.Document = fitz.open (f'{count} .{ext} ' , stream) current_page_pdf: fitz.Document = fitz.open ('pdf' , current_page_img.convert_to_pdf()) out.insert_pdf(current_page_pdf) count += 1 print(f'Saving to {OUT_FILE} ...' ) out.save(OUT_FILE) print(f'Total pages: {len (pdf)} , saved {count} of them.' ) print('exit.' )
到这里,去水印工作已经完成了。在得到干净的 pdf 文件后,可以根据需要删除 首部和尾部的部分不需要打印的页 ,缩小打印范围。对本例而言,还需要做倾斜矫正 、页面缩放 操作。
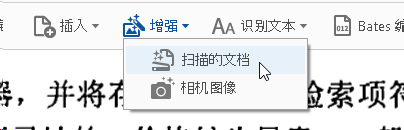
在 Adobe Acrobat 中找到 “工具” - “扫描和OCR”,点击上方工具中的 “增强” - “扫描的文档”:
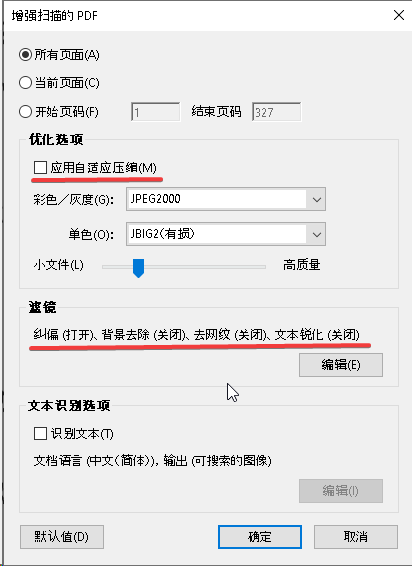
建议与我保持类似的设置。压缩可能导致背景出现模糊:
实验发现,这样的倾斜校正会带来部分页面背景模糊的问题。
猜想是 JPEG2000 图片导致,转换成 PNG 后再倾斜校正问题仍存在:
1 2 3 4 5 6 7 8 9 10 11 if ext == 'jpx' : jpg2000_stream = BytesIO(image) jpg2000 = Image.open (jpg2000_stream) png_stream = BytesIO() jpg2000.convert('RGB' ) jpg2000.save(png_stream, format ='png' ) ext = 'png' content = bytearray (png_stream.getvalue()) else : content = bytearray (image)
遂放弃倾斜校正。
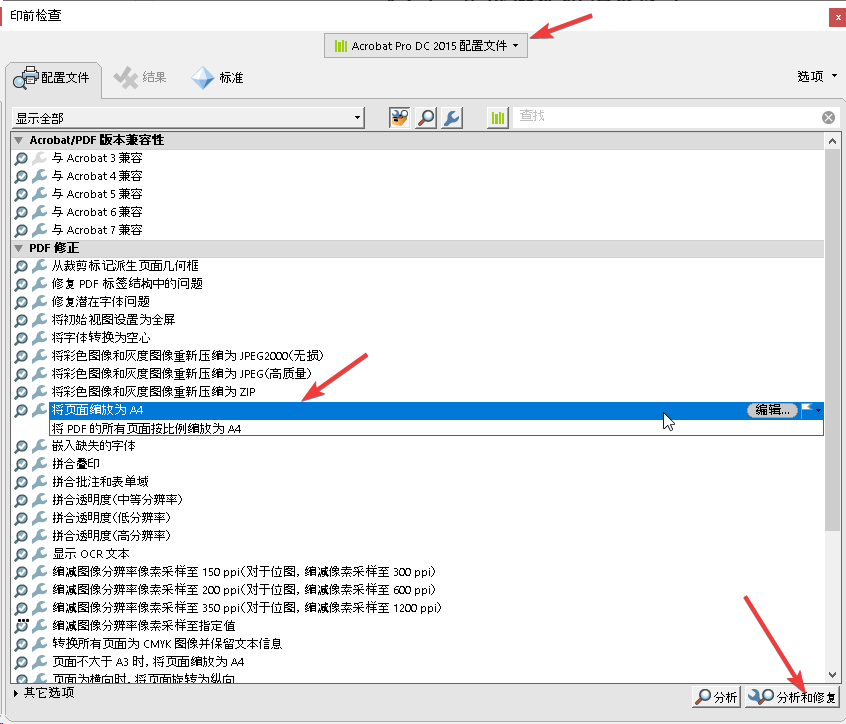
在 “工具” 中找到 “印刷制作“ - ”印前检查“,按箭头所示操作即可。